개요
여러개의 사이드 프로젝트를 진행 중이며, 이전에는 클라우드타입(CloudType)에서 무료로 서버를 실행했습니다. 그러나 클라우드타입의 정책 변경으로 인해 서버가 매일 한 번 중지되는 문제가 발생했습니다. 이에 대응하기 위해 저렴한 비용으로 여러 프로젝트의 서버를 한 대의 EC2 인스턴스에 구축하기로 결정했습니다.
여러 대의 EC2 인스턴스에 ALB(Application Load Balancer)를 사용하여 구성하는 것이 더 효율적일 수 있지만, ALB도 시간당 비용이 발생하기 때문에 모든 것을 한 대의 EC2 인스턴스에서 처리하기로 결정했습니다.
아키텍처
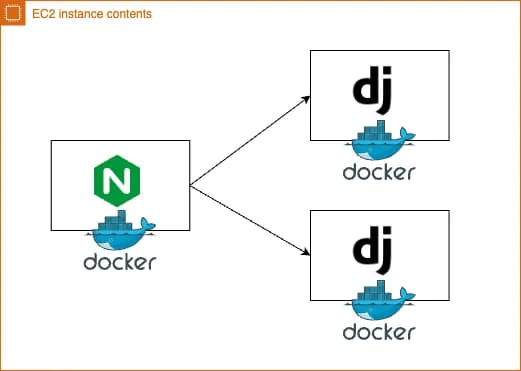
가장 경제적인 방법으로 구성하기 위해 단일 EC2 인스턴스에 Nginx를 사용하여 여러 Django 앱을 리버스 프록시하기로 결정했으며, 여러 앱을 편리하게 관리하기 위해 Docker Compose를 사용했습니다.
Nginx 설정
upstream app1 {
    server app1:8000;
}

upstream app2 {
    server app2:8000;
}

server {
    listen 80;
    server_name app1.example.com;
    server_tokens off;

    location /.well-known/acme-challenge/ {
        allow all;
        root /var/www/certbot;
    }

    location / {
        proxy_pass http://app1;
        proxy_set_header Host $host;
        proxy_set_header X-Real-IP $remote_addr;
        proxy_set_header X-Forwarded-For $proxy_add_x_forwarded_for;
        proxy_set_header X-Forwarded-Proto $scheme;
    }
}

server {
    listen 80;
    server_name app2.example.com;

    location /.well-known/acme-challenge/ {
        allow all;
        root /var/www/certbot;
    }

    location / {
        proxy_pass http://app2;
        proxy_set_header Host $host;
        proxy_set_header X-Real-IP $remote_addr;
        proxy_set_header X-Forwarded-For $proxy_add_x_forwarded_for;
        proxy_set_header X-Forwarded-Proto $scheme;
    }
}
80번 포트로 들어오는 요청을 도메인에 따라 app1과 app2로 분기하도록 구성했습니다.
app1.example.com으로의 요청은 app1 서버로 보내고, app2.example.com으로의 요청은 app2 서버로 보냅니다.
또한 SSL 인증서를 발급하기 위해 /.well-known/acme-challenge/ 경로에 대한 설정도 추가했습니다.
SSL 인증서 발급을 위해서는 소유하고있는 도메인이 필요합니다. EC2 인스턴스의 Public IP가 있고 해당 아이피와 연결된 소유 도메인이 있다면, .well-known 경로에 특정 키 파일을 생성하고 SSL 인증 서버에서 생성한 경로로 직접 접근해 해당 키파일에 접근 가능한지 확인합니다. 이때는 서비스가 80번 포트로 동작하고 있어야합니다.
Docker Compose 설정
version: "3.9"

services:
  nginx:
    restart: always
    image: nginx:latest
    ports:
      - "80:80"
      - "443:443"
    depends_on:
      - app1
      - app2
    volumes:
      - ./conf/nginx.conf:/etc/nginx/nginx.conf
      - ./data/certbot/conf:/etc/letsencrypt
      - ./data/certbot/www:/var/www/certbot

  certbot:
    image: certbot/certbot
    restart: unless-stopped
    volumes:
      - ./data/certbot/conf:/etc/letsencrypt
      - ./data/certbot/www:/var/www/certbot

  app1:
    image: app1:latest
    expose:
      - "8000"

  app2:
    image: app2:latest
    expose:
      - "8000"
Nginx 설정 파일을 conf 폴더에 위치시키고, 인증서를 저장하기 위한 certbot 컨테이너를 설정했습니다.
certbot이란? (by ChatGPT) Certbot은 Let’s Encrypt를 사용하여 웹 서버에 SSL/TLS 인증서를 쉽게 설치, 설정 및 관리할 수 있도록 도와주는 오픈 소스 도구입니다. Certbot은 Let’s Encrypt의 ACME 프로토콜을 구현하여 인증서 발급 및 갱신을 자동화합니다. 이를 통해 웹 사이트 운영자는 복잡한 과정 없이도 무료 SSL/TLS 인증서를 획득하고 사용할 수 있습니다. Certbot은 다양한 웹 서버 플랫폼을 지원하며, Apache, Nginx 등과 같은 인기 있는 웹 서버와 함께 사용할 수 있습니다. 또한, Certbot은 다양한 운영 체제에서 사용할 수 있으며, 사용자 편의를 위해 명령 줄 인터페이스를 제공합니다. Certbot을 사용하면 SSL/TLS 인증서의 발급, 설치, 갱신을 자동화하여 웹 서버 보안을 강화하고 HTTPS를 통한 안전한 통신을 쉽게 설정할 수 있습니다.
docker-compose 파일을 작성 후 docker-compose up -d 명령으로 실행시켜줍니다.
인증서 발급 스크립트
아래는 SSL/TLS 인증서 발급을 자동화하는 스크립트입니다. 이 스크립트를 사용하면 Let’s Encrypt에서 SSL/TLS 인증서를 발급받을 수 있습니다.
# 인증서 발급 스크립트 다운로드
curl -L https://raw.githubusercontent.com/wmnnd/nginx-certbot/master/init-letsencrypt.sh > init-letsencrypt.sh

# 권한설정
chmod +x init-letsencrypt.sh
사용하기전에 스크립트 내의 도메인, 경로, 이메일을 수정해야 합니다.
vi init-letsencrypt.sh 명령으로 스크립트 내용을 수정하였습니다.
#!/bin/bash

if ! [ -x "$(command -v docker-compose)" ]; then
  echo 'Error: docker-compose is not installed.' >&2
  exit 1
fi

domains=(app1.example.com www.app1.example.com)
rsa_key_size=4096
data_path="./data/certbot"
email="example@email.com" # Adding a valid address is strongly recommended
staging=0 # Set to 1 if you're testing your setup to avoid hitting request limits

if [ -d "$data_path" ]; then
  read -p "Existing data found for $domains. Continue and replace existing certificate? (y/N) " decision
  if [ "$decision" != "Y" ] && [ "$decision" != "y" ]; then
    exit
  fi
fi


if [ ! -e "$data_path/conf/options-ssl-nginx.conf" ] || [ ! -e "$data_path/conf/ssl-dhparams.pem" ]; then
  echo "### Downloading recommended TLS parameters ..."
  mkdir -p "$data_path/conf"
  curl -s https://raw.githubusercontent.com/certbot/certbot/master/certbot-nginx/certbot_nginx/_internal/tls_configs/options-ssl-nginx.conf > "$data_path/conf/options-ssl-nginx.conf"
  curl -s https://raw.githubusercontent.com/certbot/certbot/master/certbot/certbot/ssl-dhparams.pem > "$data_path/conf/ssl-dhparams.pem"
  echo
fi

echo "### Creating dummy certificate for $domains ..."
path="/etc/letsencrypt/live/$domains"
mkdir -p "$data_path/conf/live/$domains"
docker-compose run --rm --entrypoint "\
  openssl req -x509 -nodes -newkey rsa:$rsa_key_size -days 1\
    -keyout '$path/privkey.pem' \
    -out '$path/fullchain.pem' \
    -subj '/CN=localhost'" certbot
echo


echo "### Starting nginx ..."
docker-compose up --force-recreate -d nginx
echo

echo "### Deleting dummy certificate for $domains ..."
docker-compose run --rm --entrypoint "\
  rm -Rf /etc/letsencrypt/live/$domains && \
  rm -Rf /etc/letsencrypt/archive/$domains && \
  rm -Rf /etc/letsencrypt/renewal/$domains.conf" certbot
echo


echo "### Requesting Let's Encrypt certificate for $domains ..."
#Join $domains to -d args
domain_args=""
for domain in "${domains[@]}"; do
  domain_args="$domain_args -d $domain"
done

# Select appropriate email arg
case "$email" in
  "") email_arg="--register-unsafely-without-email" ;;
  *) email_arg="--email $email" ;;
esac

# Enable staging mode if needed
if [ $staging != "0" ]; then staging_arg="--staging"; fi

docker-compose run --rm --entrypoint "\
  certbot certonly --webroot -w /var/www/certbot \
    $staging_arg \
    $email_arg \
    $domain_args \
    --rsa-key-size $rsa_key_size \
    --agree-tos \
    --force-renewal" certbot
echo

echo "### Reloading nginx ..."
docker-compose exec nginx nginx -s reload
위의 스크립트 내에서 domains, data_path, email 등을 수정한 후 sudo ./init-letsencrypt.sh 명령으로 스크립트를 실행하면 SSL/TLS 인증서가 발급됩니다.
HTTPS 설정
upstream app1 {
    server app1:8000;
}

upstream app2 {
    server app2:8000;
}

server {
    listen 80;
    server_name app1.example.com;
    server_tokens off;

    location /.well-known/acme-challenge/ {
        root /var/www/certbot;
    }

    location / {
        return 301 https://$host$request_uri;
    }
}

server {
    listen 443 ssl;
    server_name app1.example.com;
    server_tokens off;

    ssl_certificate /etc/letsencrypt/live/app1.example.com/fullchain.pem;
    ssl_certificate_key /etc/letsencrypt/live/app1.example.com/privkey.pem;
    include /etc/letsencrypt/options-ssl-nginx.conf;
    ssl_dhparam /etc/letsencrypt/ssl-dhparams.pem;

    location / {
        proxy_pass http://app1;
        proxy_set_header Host $host;
        proxy_set_header X-Real-IP $remote_addr;
        proxy_set_header X-Forwarded-For $proxy_add_x_forwarded_for;
        proxy_set_header X-Forwarded-Proto $scheme;
    }
}

server {
    listen 80;
    server_name app2.example.com;

    location /.well-known/acme-challenge/ {
        allow all;
        root /var/www/certbot;
    }

    location / {
        proxy_pass http://app2;
        proxy_set_header Host $host;
        proxy_set_header X-Real-IP $remote_addr;
        proxy_set_header X-Forwarded-For $proxy_add_x_forwarded_for;
        proxy_set_header X-Forwarded-Proto $scheme;
    }
}
app1에 대해서만 인증서를 발급받았으므로 app1의 80번 포트로 들어오는 요청에 대해서는 443번 포트로 redirect 합니다. 또한 발급받은 인증서 정보를 입력해주고 경로는 발급받은 도메인으로 설정합니다.
app2에 대해서도 위 과정을 반복하면 인증서를 하나 더 발급 받아줍니다.
인증서 자동 갱신
마지막으로, SSL/TLS 인증서의 자동 갱신을 위해 Docker Compose를 사용하여 환경을 설정합니다.
다음은 Docker Compose 파일의 예시입니다:
version: "3.9"

services:
  nginx:
    restart: always
    image: nginx:latest
    ports:
      - "80:80"
      - "443:443"
    depends_on:
      - app1
      - app2
    volumes:
      - ./conf/nginx.conf:/etc/nginx/nginx.conf
      - ./data/certbot/conf:/etc/letsencrypt
      - ./data/certbot/www:/var/www/certbot
    command: '/bin/sh -c ''while :; do sleep 6h & wait $${!}; nginx -s reload; done & nginx -g "daemon off;"'''

  certbot:
    image: certbot/certbot
    restart: unless-stopped
    volumes:
      - ./data/certbot/conf:/etc/letsencrypt
      - ./data/certbot/www:/var/www/certbot
    entrypoint: "/bin/sh -c 'trap exit TERM; while :; do certbot renew; sleep 12h & wait $${!}; done;'"

  app1:
    image: app1:latest
    expose:
      - "8000"

  app2:
    image: app2:latest
    expose:
      - "8000"
위 설정에서는 Nginx 컨테이너가 6시간마다 자동으로 재시작하여 SSL/TLS 인증서를 갱신하고, Certbot 컨테이너가 12시간마다 SSL/TLS 인증서를 자동으로 갱신합니다.
이를 통해 SSL/TLS 인증서의 유효성을 유지하고 보안을 유지할 수 있습니다.
참고글
https://pentacent.medium.com/nginx-and-lets-encrypt-with-docker-in-less-than-5-minutes-b4b8a60d3a71 https://velog.io/@wksmstkfka12/%EB%96%A0%EB%A8%B9%EC%97%AC%EC%A3%BC%EB%8A%94-Nginx-Docker%EC%97%90-%EB%AC%B4%EB%A3%8C-SSL-%EC%A0%81%EC%9A%A9 https://node-js.tistory.com/32